Notion Widget for drand Public Randomness!

Creating a Notion Widget to display the latest Public Randomness from drand!
In this blog post, we’ll dive into creating a simple Notion widget that displays the latest public randomness from drand (for both the default and quicknet beacons from the League of Entropy network).
An overview of drand
Our earlier blog post titled "A Guide on How to Use drand", explains the importance of public randomness and how drand provides it using a threshold network. It offers a step-by-step tutorial on setting up and using drand's randomness in applications, including fetching randomness with JavaScript, verifying it, and using it in real-life scenarios like coin flips and random selection. The guide emphasizes fairness and verifiability in applications requiring random numbers.
In a nutshell, drand uses a threshold network, where multiple parties collaborate to generate random numbers, ensuring no single entity can predict or bias the outcome. By leveraging hashed signatures without a complete secret key held by any party, drand achieves verifiable randomness. This system's reliability and unpredictability make it ideal for projects with a dependency on secure and verifiable randomness.
Step into Notion Widgets
Notion widgets are customizable, embedded elements that can be added to Notion pages to enhance functionality and interactivity. These widgets can display real-time information, like clocks, weather updates, calendars, or external content such as videos, and integrate third-party services directly within Notion. They are typically created using code snippets or widget creation tools and then embedded in Notion using the embed block feature. This enhances productivity and information accessibility within Notion workspaces.
Let’s make a drand notion widget!
ReactJS Component
The first step is to create a basic ReactJS application that can be embedded in any Notion page. To fetch the latest randomness beacon, the application will need to integrate drand JavaScript client. The client is publicly available https://github.com/drand/drand-client.
Firstly, we will create a new React project and then install the drand client. It is the same client used in the previous blog post. We will use it to interact with the drand randomness beacon networks (default network and quicknet) in our ReactJS code.
npm install drand-client
Once the drand client is installed, we’re ready to start implementing our simple ReactJS application! The application will allow users to select their desired network (i.e., default or quicknet) from a dropdown menu and display the latest randomness after each round, the round number and a countdown to the next randomness generation round or ETA.
Appropriate API URLs for the mainnet default and quicknet networks can be found here: https://docs.drand.love/docs/dev-guide/3-0-dev-guide
Let’s implement the reactjs component in our App.js file.
// React is the main library for building the UI components
// useState, useEffect, useRef are React hooks for managing state, side effects, and mutable references, respectively.
import React, { useState, useEffect, useRef } from 'react';
// This library is used to interact with the drand (decentralized randomness) network.
import { watch, FastestNodeClient } from 'drand-client';
// A built-in JavaScript object for handling large integers, declared global to avoid ESLint issues.
/* global BigInt */
The main functional component of the React app is the App() function. Let’s go ahead and start implementing it.
function App() {
Let’s add some state variables!
// The latest randomness value
const [latestRandomness, setLatestRandomness] = useState(null);
// The estimated time of arrival of the next randomness
const [eta, setETA] = useState(null);
// The current round number
const [round, setRound] = useState(null);
// The current selected network
const [network, setNetwork] = useState('default');
// A reference to the drand client instance
const clientRef = useRef(null);
// A reference to an AbortController for managing asynchronous tasks
const abortControllerRef = useRef(null);
Following the state variables, we will implement the rest of the JavaScript fo the App component.
// useEffect runs the fetchLatestRandomness function when the component
// mounts or when network changes.
useEffect(() => {
		// fetchLatestRandomness async function to fetch randomness data.
    const fetchLatestRandomness = async () => {
      try {
	      // chainHash, publicKey are set based on the selected network.
        let chainHash, publicKey;
        let updateInterval = 30 * 1000;

        if (network === 'default') {
          chainHash = '8990e7a9aaed2ffed73dbd7092123d6f289930540d7651336225dc172e51b2ce';
          publicKey = '868f005eb8e6e4ca0a47c8a77ceaa5309a47978a7c71bc5cce96366b5d7a569937c529eeda66c7293784a9402801af31';
        } else if (network === 'quicknet') {
          chainHash = '52db9ba70e0cc0f6eaf7803dd07447a1f5477735fd3f661792ba94600c84e971';
          publicKey = '83cf0f2896adee7eb8b5f01fcad3912212c437e0073e911fb90022d3e760183c8c4b450b6a0a6c3ac6a5776a2d1064510d1fec758c921cc22b0e17e63aaf4bcb5ed66304de9cf809bd274ca73bab4af5a6e9c76a4bc09e76eae8991ef5ece45a';
          updateInterval = 3 * 1000;
        }

        const options = {
          disableBeaconVerification: false,
          noCache: false,
          chainVerificationParams: { chainHash, publicKey }
        };

				// List of drand API endpoints
        let urls = [
          'https://api.drand.sh',
          'https://api2.drand.sh',
          'https://api3.drand.sh',
          'https://drand.cloudflare.com'
        ];

        if (network === 'quicknet') {
          urls = urls.map(url => `${url}/${chainHash}`);
        }

				// Create an instance of FastestNodeClient from drand-client
        const headers = { 'Access-Control-Allow-Origin': '*', 'Access-Control-Allow-Credentials': 'true' };
        const client = new FastestNodeClient(urls, options, { headers });

        if (clientRef.current) {
          clientRef.current.stop();
        }
        if (abortControllerRef.current) {
          abortControllerRef.current.abort();
        }

        clientRef.current = client;
        client.start();

        const abortController = new AbortController();
        abortControllerRef.current = abortController;

				// Asynchronously iterates over beacons (randomness values)
				// from the drand network
        for await (const beacon of watch(client, abortController)) {
          const currentTime = new Date().getTime();
          // Calculate and set the next ETA for randomness
          const nextETA = new Date(currentTime + updateInterval);
          // Update state with new randomness data
          setETA(nextETA.toLocaleTimeString());
          setRound(beacon.round);
          setLatestRandomness(BigInt(`0x${beacon.randomness}`).toString());
        }
      } catch (error) {
        console.error('Error fetching randomness:', error);
      }
    };

    fetchLatestRandomness();

    return () => {
      if (clientRef.current) {
        clientRef.current.stop();
      }
      if (abortControllerRef.current) {
        abortControllerRef.current.abort();
      }
    };
  }, [network]);
Next, we will add a function called handleNetworkChange to update the network state when the user selects a different network.
const handleNetworkChange = (event) => {
    setNetwork(event.target.value);
  };
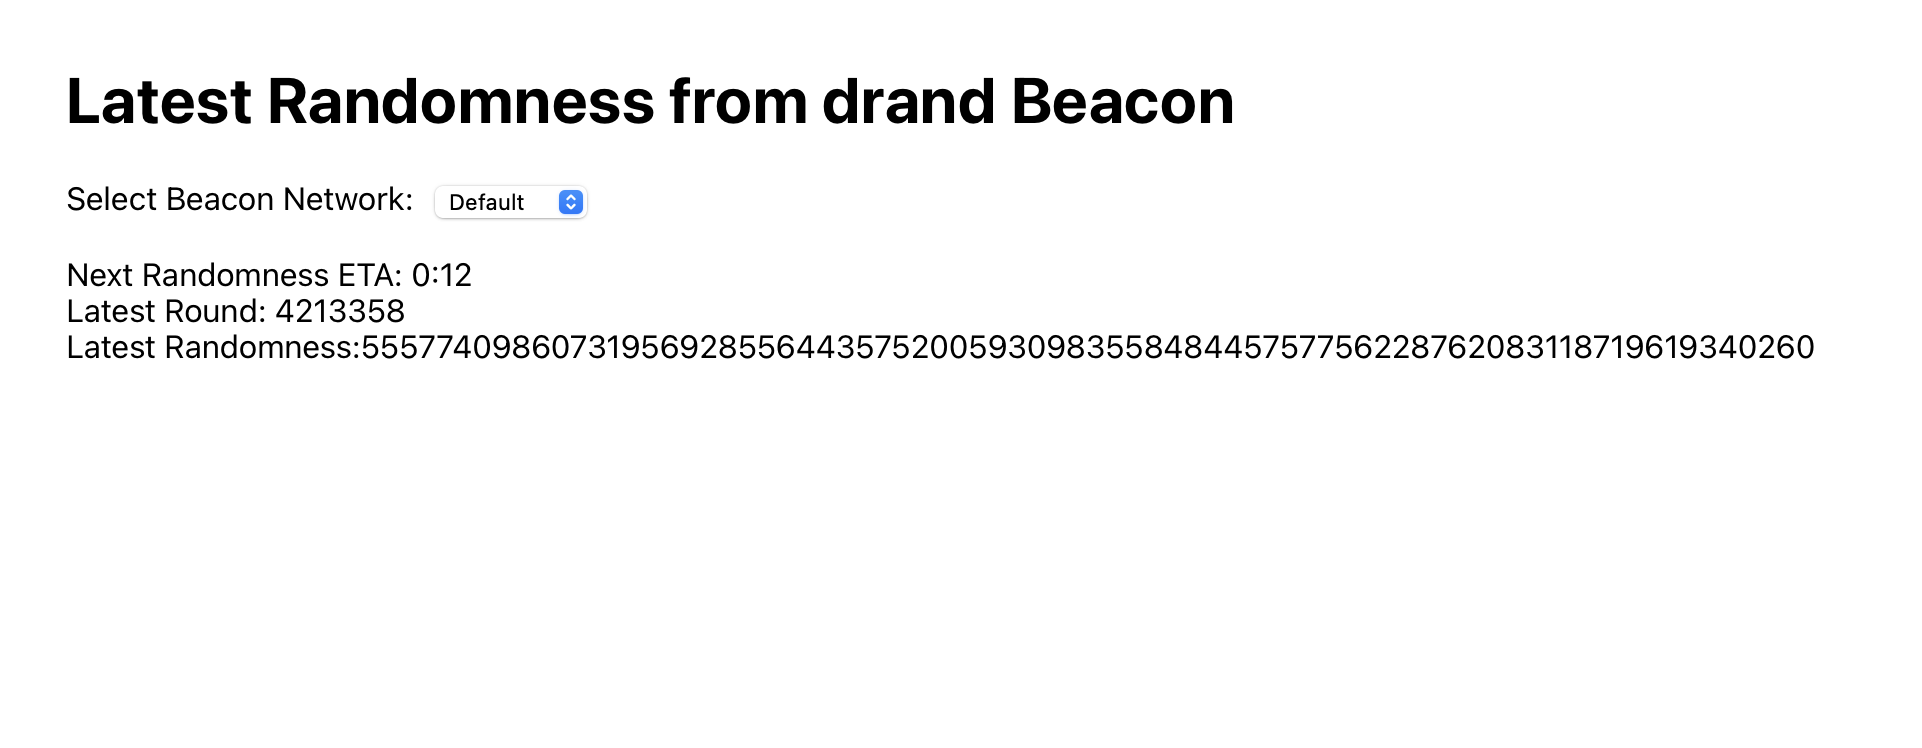
In the next part of the react component implementation, customise the JSX to render the UI as preferred. In our example, the UI displays a dropdown menu for users to select the preferred network (i.e., default or quicknet), the ETA of the next randomness, the latest round and the latest randomness.
return (
    <div className="App">
      <header className="App-header">
        <h1>Latest Randomness from drand Beacon</h1>

        <div>
          Select Beacon Network:
          <select value={network} onChange={handleNetworkChange} style={{ marginLeft: '10px' }}>
            <option value="default">Default</option>
            <option value="quicknet">Quicknet</option>
          </select>
        </div>

        <br />

        Next Randomness ETA: {eta ? (
          <p>{eta}</p>
        ) : (
          <p>Loading...</p>
        )}

        Latest Round: {round ? (
          <p>{round}</p>
        ) : (
          <p>Loading...</p>
        )}

        Latest Randomness: {latestRandomness ? (
          <p>{latestRandomness}</p>
        ) : (
          <p>Loading...</p>
        )}
      </header>
    </div>
  );

export default App;
Once implemented, to start the React application, run
npm start
This will launch the application on http://localhost:3000. Open this URL in your browser to see the latest randomness from the drand beacon.
At this point, you've successfully created a React web page that fetches and displays randomness from the drand distributed randomness beacon! This setup can be a foundation for more complex applications requiring secure and verifiable randomness.
Before embedding our react app into a Notion page, we need to create a GitHub repository and push our code to the repository. This will allow us to use GitHub Pages to publish our React application to the web!
GitHub Pages Component
Now that you've built a React app to display randomness from the drand beacon, the next step is to deploy it on GitHub Pages. This will make your application accessible on the web.
Step 1: Install GitHub Pages Package
First, you need to install the gh-pages package, which will help you deploy your app to GitHub Pages.
Step 2: Update package.json
Next, update your package.json file to include the homepage, predeploy, and deploy scripts.
- Homepage: Add a
homepagefield to specify the URL where your app will be hosted. This is typicallyhttps://<username>.github.io/<repository-name>. - Scripts: Add
predeployanddeployscripts.
Here’s an example of how your package.json should look:
{
  "name": "drand-notion-widget",
  "version": "0.1.0",
  "private": true,
  "homepage": "<https://yourusername.github.io/drand-notion-widget>",
  "dependencies": {
    "drand-client": "^0.3.1",
    "react": "^17.0.2",
    "react-dom": "^17.0.2",
    "react-scripts": "4.0.3"
  },
  "scripts": {
    "start": "react-scripts start",
    "build": "react-scripts build",
    "predeploy": "npm run build",
    "deploy": "gh-pages -d build"
  },
  "devDependencies": {
    "gh-pages": "^3.2.3"
  }
}
Replace <username> with your GitHub username and <repository-name> with the name of your GitHub repository.
Step 3: Initialize Git Repository
Go to GitHub and create a new repository with the same name you used in the homepage field of your package.json.
Follow the instructions provided by GitHub to link your local repository to the newly created GitHub repository.
Step 4: Deploy to GitHub Pages
Finally, run the deploy script:
npm run deploy
This command will create a production build of your React app and deploy it to the gh-pages branch of your GitHub repository. GitHub Pages will then serve your application from this branch.
Step 5: Access Your Deployed App
After deploying, your app should be accessible at https://<username>.github.io/<repository-name>.
By following these steps, you will have successfully deployed your React application to GitHub Pages, making it accessible to anyone with the URL. Happy deploying!
Putting it Together
With the GitHub Pages URL ready (e.g., https://yourusername.github.io/drand-notion-widget), we can embed the drand reactjs application we deployed earlier in Notion.
Open the Notion page where you want to embed the URL, and embed it with the following steps:
- Click on the
+button to add a new block or type/embedto bring up the embed block option.
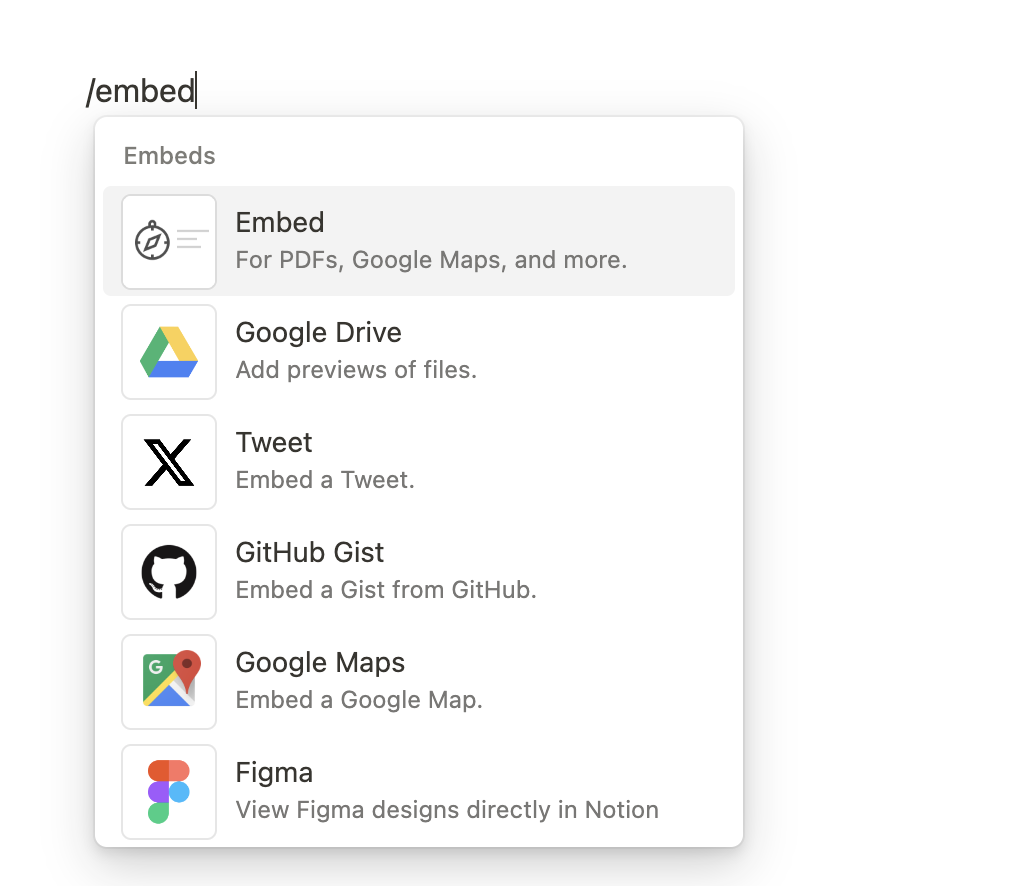
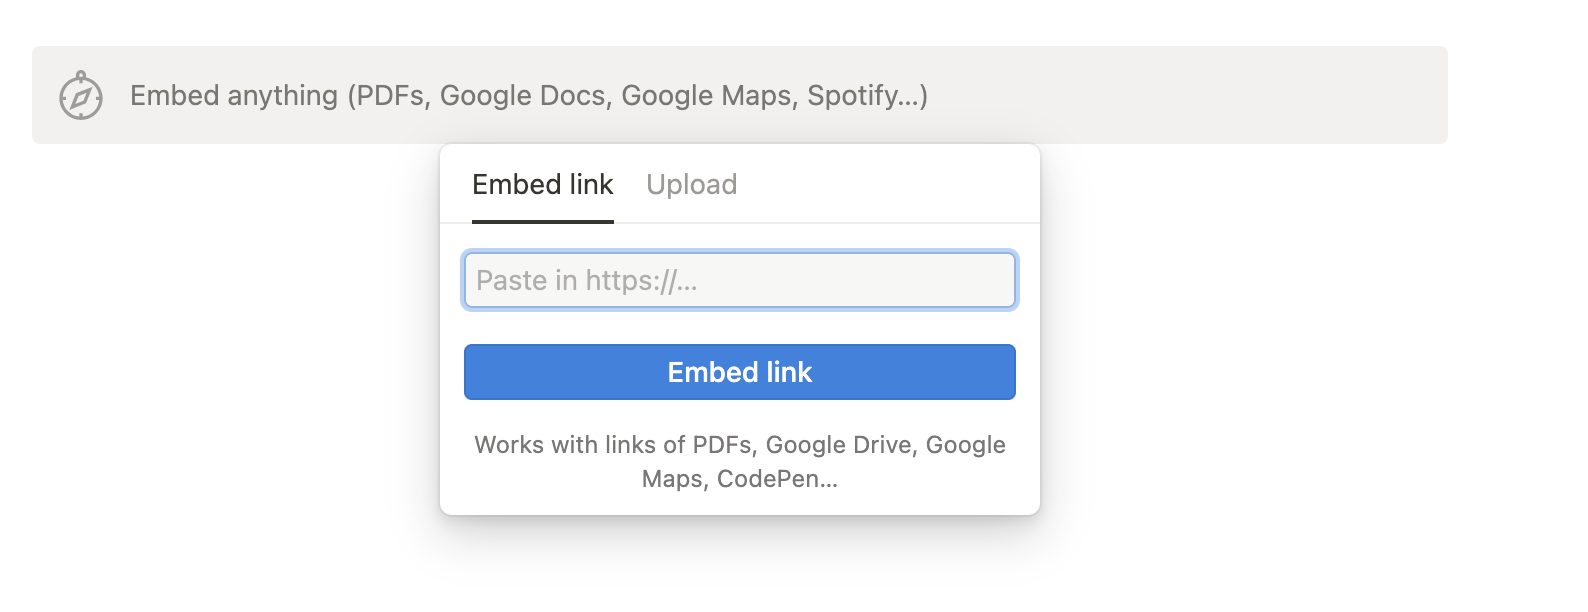
- Select the
Embedoption from the list. - Paste your GitHub Pages URL into the embed block.
- Press
Enteror click on theEmbed linkbutton.
Once the URL is embedded, you can resize the embed block by dragging the handles on the sides to fit your content appropriately. Notion might show a preview of your web app directly within the page, depending on how your app is configured and the type of content it displays.
An example drand widget embedded in a Notion page is shown below.
To Recap
We have successfully created a ReactJS application that displays the latest drand randomness beacon from both drand main network options (default and quicknet)!
We could do more with our Notion widget, e.g., styling it to our preference. To do this, simply modify the ReactJS code and redeploy it using gh-pages and the changes should be reflected at the same URL.
Happy coding!